I recently wanted to learn more about Fusion 360 3D designing. To further my 3D modeling experience, I started another project, this time to redesign one of my existing 3D printers from scratch.
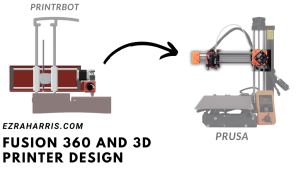
It started with looking at the Prusa Mini+ and how the X gantry worked. The Prusa Mini is an FDM 3D printer by Prusa, a German company. It has a similar style to how my Printrbot Simple Metal is oriented. One significant difference is that the X gantry moves along the rods instead of the rods moving along a centered Z gantry. For example:

As shown in the figure, the Prusa Mini+ is designed so that only what is needed is moving, the Fans (part cooling, hotend cooling), Extruder, Hotend, and Z sensor. One plus of having the Prusa Mini Design is that there’s very minimal weight and thus less mass movement. I only have to carry the needed weight instead of a significantly heavier X arm on the Printrbot. This isn’t necessarily a downside. 90% of the Printrbot is machined, so it’s highly durable and can “fall off a table and go right back to printing” – Brook Drumm (CEO of Printrbot).
Another great thing about the Prusa Mini+ is that Prusa manufactures everything in-house and 3D prints most of the parts for their printers. I have found that to be useful as they also release all of their step files which I can use to modify the designs to my liking. Same with the Printrbot, even with it being shut down a couple of years ago. At BrookDrumm.com, there are uploaded .F3D files for every model he’s produced and even some that haven’t been manufactured,
I started by studying both printer designs in Fusion, how they worked, what made them different, and how I could combine both to create the best of both worlds. Next, I began designing my first iteration of my “Printrbot with the Prusa Mini style”PrintrMini.” The first one was very rough. A ton of wasted printed space, an inefficient motor mount with weight not being distributed properly, and a couple of more minor issues: At this point, I’m hoping for one of my last iterations of the design.
Designing the actual arm that slides. This is version 1 to see what works best @printrbot Its a bit plain but might work pic.twitter.com/Q6k2aI79Xr— Ezra Harris (@Ezradharris) April 7, 2023
V1 of my design
After some feedback on a Discord server, I redesigned both the toolhead and the X-Z gantry mount. This time to be as compact as possible with as even weight distribution as I could manage and utilize many of the original parts. This was V2:

(Above: I figured out how to render in Fusion, so I tried my hand at it. V2 of my design)
I also bought an E3D V6 Hotend since the original hotend (Ubis 13s) was rather old and had some flaws compared to the newer V6; since the V6 hotend and the Ubis hotend have very similar designs, the original extruder could mount it, which a massive bonus with not having to order another extruder assembly.
I decided to go for a very similar style in V2 to the original X/Z gantry attachment. I utilized the same motor mount and lead screw to make it more compact and utilize as many original parts as possible.
At the moment, I’m working on V3; version 3 would be a machined X/Z gantry with an almost identical design to the original Printrbot billet but without the bearings for the X gantry:

(Above: V3 of my X/Z gantry mount)
I didn’t change the toolhead mount in V3, as I’m still finishing up some smaller details on the mount. But since it’s 3D printed, I can always print a new design if my current model has flaws. The new X/Z mount would utilize press-fit bearings and press-fit 8mm rods. Using a machined mount would provide several benefits, one being that it’s aluminum and would be super strong compared to my plastic 3D prints; another is that it would still utilize the aesthetics from the original Printrbot with it being machined metal; it is called Printrbot Simple Metal after all.
I’m still getting a quote from my brother (CovenantMFG) for that at this time, so v3 may or may not happen. If not, ill probably figure out a way to 3D print it, most likely in Carbon Fiber infused filament for strength and temperature resilience.
So far, this experience of learning fusion and changing my design over and over for more compact and practical parts has been delightful.
A big plus in this process has Fusion’s student plan. The student plan allows me access to almost every feature for free as long as I’m a student. Previously I had been using the Personal license, which included limited features, such as only up to 10 design files at a time and only being able to import .step files for converting 3D models.

Leave a Reply