Category: Technology

Posts that are tech related
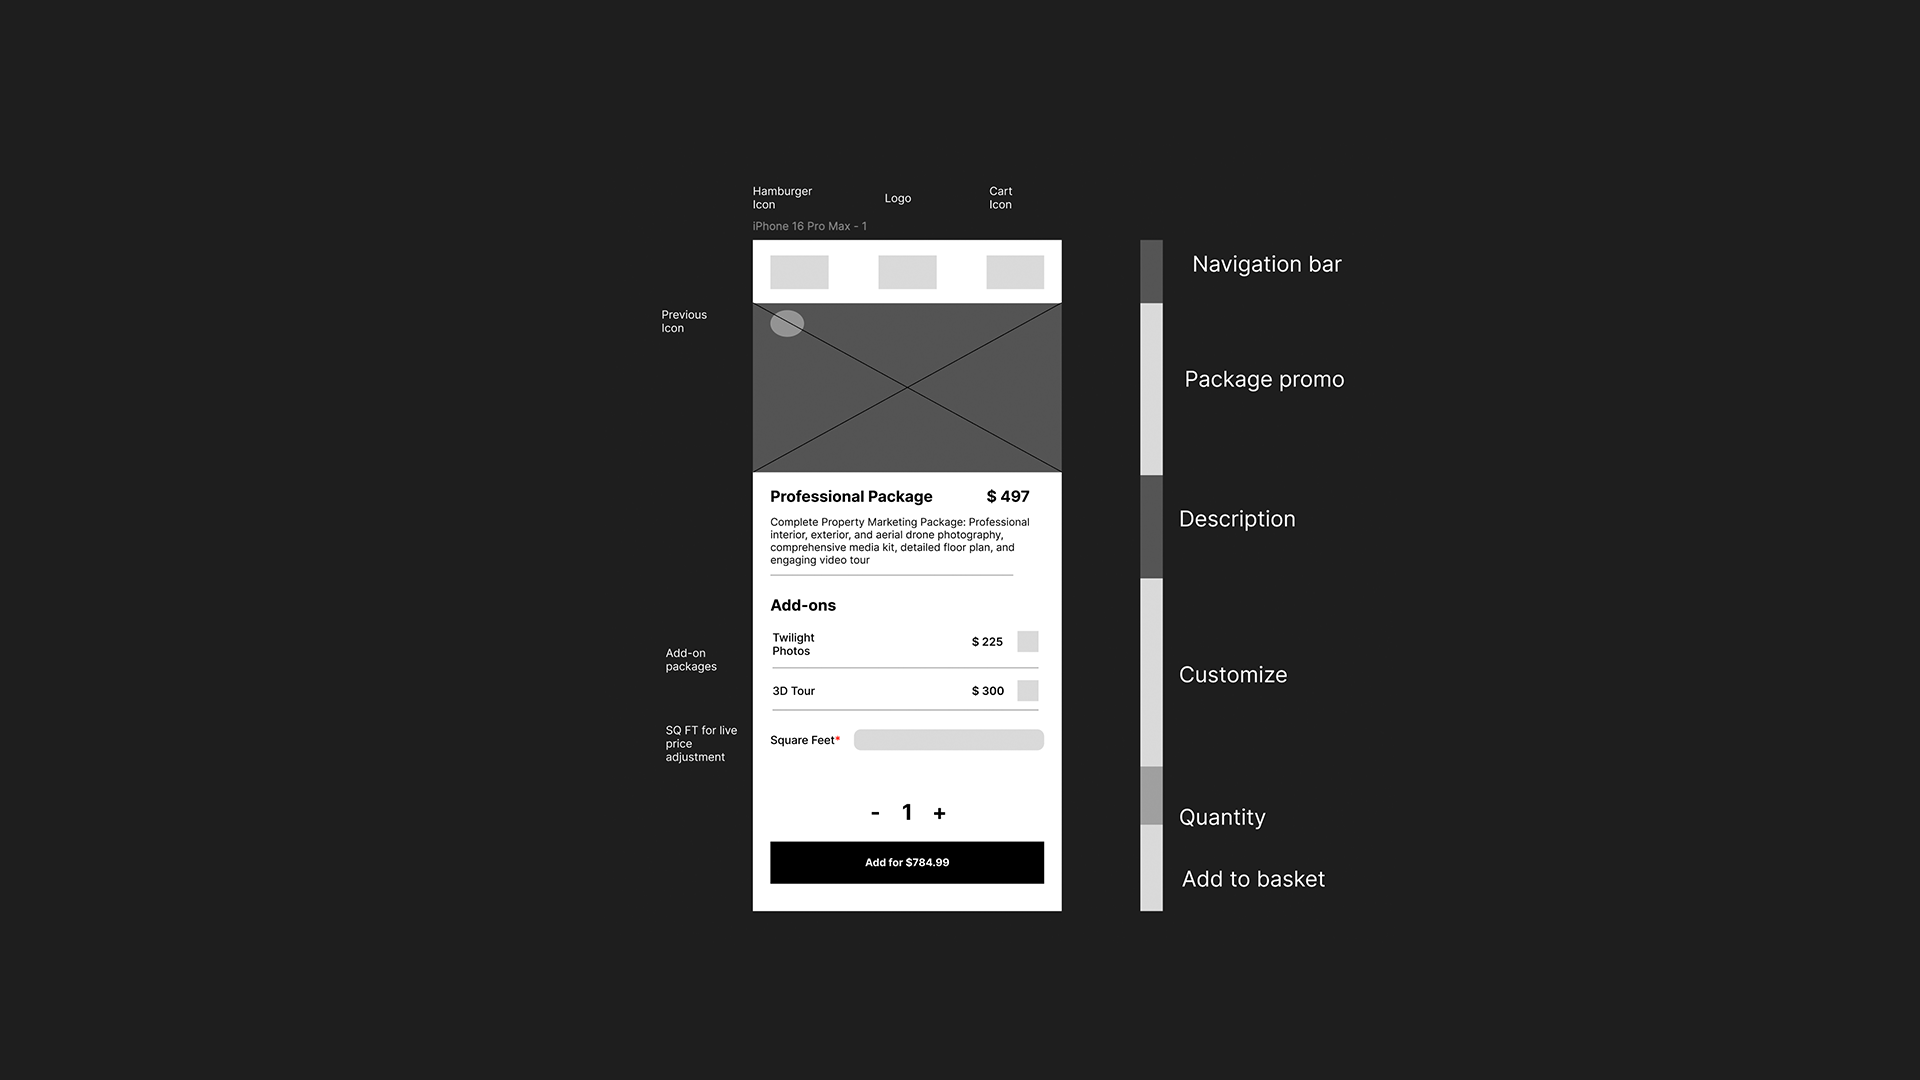
  • Learning through Self Implementation of Features

    I recently covered FreeShow, a software made for presentations in Churches. One of the features that I liked and talked about was the open-source nature of the App. In this case, open-source means having the app’s code publicly available on GitHub, with any changes made, issues, or additions to its Codebase available to read / post.

    Blog post covering FreeShow

    I noticed while poking around the GitHub page for FreeShow, is a large percentage of the code’s language is written in TypeScript.5

    Typescript is similar to Javascript in that it adds to the existing framework of JS with additional checks like types, which ensures the data of a variable is the correct “type” it’s been told it is, making it easier to catch errors. I’ve been learning Javascript through Coursera’s Front-end Web Development course, and even though not explicitly teaching TypeScript, Typescript contains everything Javascript has, just with additional features, making it a more straightforward matter of learning those additional features rather than a whole new language.

    With the knowledge of FreeShow’s codebase being primarily of a language I could understand, I decided to fork the repository (forking creates a copy of the repository, which is separated from the main code). I started looking through the code to see how it’s constructed and if I could implement my features into the app, that would be useful.

    I also later found this page, which contains all the info they give to devs willing to contribute, like where they need help with apps and how their code is typically structured.

    I started with one implementation I would find helpful: a way for the application to track when a song gets “used” and then, with that information, have it pull from the oldest used songs from the current date. The primary use case for this feature would be picking songs for Sunday’s service. The current way we do it with Google Slides is to attach an ID to each slideshow, and as the year goes by, eventually, it adds up to #100. In which case, we start over with Sunday #001’s songs. Making it impossible to select a song we sang last week.

    Luckily, FreeShow already has a similar variable implemented to track when a song has been last used, called “used.” With that, I made a simple helper script that attaches to the existing “used” variable, “Chronicle.” Chronicle compares the used date with a reference date like Jan 01, 2024, and returns the day value of that comparison.

    In reality, this is a super simple script and hardly took any time, mostly being “inspired” by this post by Javatpoint. The more interesting part of adding a simple feature like this is digging through a full app’s code and figuring out what function is used for what. For example, finding where the “used” cache was getting updated was initially difficult. Still, eventually, I found it in a function called “update” because of a message that gets logged when opening a “show” item, and that message linked to the start of the trial to find the “used” cache update line.

  • Ditching Google for an Open Alternative

    Ditching Google for an Open Alternative

    In the event of researching software for my church to help streamline the streaming process and slideshows. Initially utilizing less ideal software for A/V, I’ve found some fascinating tools that directly target my problems with the software we were using; whether directly targeting churches or not, I’ve come across many solutions.

    The “it works” problem:

    The existing setup we used before FreeShow was Google Slides, which was not the most glamorous software. It was the best free “software” for our use case and worked about 90% of the time. But it also had downsides, which made it more of a “workaround” than a proper solution.

    One such problem was editing slides and keeping track of lyric edits. We generally follow this process for the order of Sunday slides:

    Diagram showing slides in order

    Each song is imported from another Google Slides file. For example, if we were to sing “God Rest Ye Merry Gentlemen.” It would be pulled from another Google Slides file containing just that song and copied to Sunday’s Presentation.

    The problem with this is whenever we edit a slideshow, i.e., the band plays it with one extra Chorus, a word is misspelled, a verse is missing, etc. That edit wouldn’t make it to the original song’s slide file. Then, the next time it’s used in a Sunday Presentation, it will not have the edits applied. While a minor problem, it still has an impact in the event of editing it last minute before service starts.

    Another problem I had was with basic slide control. Arrow keys had to be used with the Google Slides window being selected, which I worked around with a hotkey that, when pressed, would switch windows to Chrome and hit the > arrow button. But that hotkey contained issues in the event of a second Chrome window being open, and the program couldn’t figure out which one to choose.

    The Solution:

    I first went to ProPresenter, probably the most popular presentation software on the market. With many organizations using Propresenter, like Bethel, Delta Airlines, NASA, and The White House, they have almost every integration one would ever need. With even support for SongSelect, which is what we have used in the past for getting song licenses/lyrics.

    pricing for ProPresenter Dec 2024

    One problem, however, is cost. With the surplus of features comes the price of the program itself. Starting at ~290/yr, it isn’t exactly friendly for smaller churches. Also, considering Google Slides is free, it is hard to argue with something that has been working “fine” for the past few years. A couple of inconveniences don’t justify additional bills for the church.

    That’s when I came across FreeShow, which, as the name implies, is a free slideshow software developed by the folks at ChurchApps. It is one type of software designed specifically for churches and contains features for everyday presentations. What makes the FreeShow free is partially due to its “crowdfunding” nature. Its code is open-sourced on Github, making it easier for other developers to contribute, make feature requests, and create bug reports.

    What are the Features?

    The features I’ve come to like about FreeShow, to name a few, are:

    • Each song keeps its edits made previously
    • Custom templates
    • Quickly drag and drop the songs for Sunday from your database
    • Browser connections, including remote control, highlighting tool, and virtually the whole show editor GUI, are accessible over the local network in any browser.
    • Integration with Companion (another super cool software for Stream Deck)
    • Cloud backup with syncing across computers
    • A quickly accessible Media tab with free images/videos
    Features that FreeShow advertises

    Another big plus for me is how often the app gets updated. While that means frequent updating can be annoying, new features and bug fixes are pushed more often. The developers are active in the Issues tab, responding to my submitted issue within a day or so.

    Lurking issues:

    But that brings up the topic of issues; being an open-source donation-funded program, it comes with bugs. Most of the things I’ve come across are slight lags, editing not working at times, performance problems, and media 404’ng, which causes blank backgrounds. Some are acceptable, and a software restart will usually amend it, while others are (from what I can tell) compatibility problems with MacOS/Windows, as I don’t usually have the same issues occurring on both computers.

    One such issue I recently encountered is that the media is not loading. Looking at the console, it ends up reporting a “cannot reach” error to the image URL. This error appears especially when syncing across computers; it’s only recently and has not been reported.

    I’m excited to see where it goes, as the updates are relatively frequent. A benefit of the open-source nature is I can fork it, download it, and mess with any part of the application, and it’s written in 50% TSX, which I’ve been working through with Coursera’s Frontend Course.

    One example of a feature I’m trying to implement for myself is chronicling, a modification of the existing “Used” feature that tracks the last date it was used in a slideshow. Chronicling will be a way to track each show by a unique number, which will change by the date it’s used. With that, I want to implement a way to choose the oldest number based on the current date, eventually making a way of automating the song selection process for each Sunday. One button will grab ~6 of the oldest songs used and place them into the current show.

    In summary, FreeShow is a promising application that’s been a massive upgrade from what we had used. Being a newer application, it suffers from bugs but is regularly updated with fixes and what seems to be an active developer community.

    *You can support FreeShow and ChurchApp’s other programs by donating on their GitHub Sponsor page.

    All rights to ChurchApps and FreeShow belong exclusively to them. I’m not sponsored by them, endorsed by them, or in any way officially linked to their software*

  • Neopixel Frustrations to Custom RGBW LED Modules

    Neopixel Frustrations to Custom RGBW LED Modules

    After having issues with the Neopixel LED modules on the two newer drones (a blog post about that headache is coming soon…), I decided to try a different design by Techventures Sean for an LED module based on the use case of Skybrush drones.

    Heads up, this post is part of a more extensive series about building drones for a small drone show. This post is part six of the series, and previously, I covered 3D designing mounts for the LED modules from Adafruit.

    I mentioned two separate LED module designs in the first paragraph. But what are these two options?

    The option we have currently implemented is the 4W LEDs from Adafruit. These are cheap and offer a plug-and-play way to light up the sky. They also work under the NeoPixel branding, so documentation is extensive. I covered that setup in this post:

    The second option is what I’ll be covering in this post. Sean, the creator of this design, recommended it to me on the Skybrush Discord when I expressed frustration with some problems with the Neopixel LEDs.

    The design for the light module comprises four main controlling components, BGRW (as shown in the animation below. Each part is individually controlled via 4 PWM signals from the flight controller addressing each light color:

    After reviewing most diagrams and parts and looking at what tools I need for assembly, I ordered all the necessary parts from JLCPCB (which manufactures PCBs), LCSC Parts (which manufactures the elements, like resistors and capacitors), and the LED chips themselves from Amazon. Shipping took about a week to arrive.

    img: Sean (TechVentures)

    light module from Sean Techventures. PCB DESIGN

    I began attempting to solder the first parts onto the PCB when it became more apparent how unprepared I was. One obstacle was the solder itself. I installed my TS101 soldering iron with a small tip, but the solder wasn’t flowing well, and flux made a mess of it.

    Close up of solder paste under microscope

    I ordered a similar but thinner version of the solder I’d been using called Solder Paste. Solder paste comprises primarily micro solder beads, which, mixed with a flux-like liquid, lowers the melting temperature to about 180c instead of the 250c I had been accustomed to. 1

    img: Solder paste on PCB, with a closeup taken under the microscope.

    With the soldering down and the assistance of a microscope, I could nail down the assembly: placing the components and eventually soldering them into place. Although the first attempt did come with its problems, more minor mistakes mostly – not being patient and forgiving when I misplaced a component. Remember how much solder paste needs to be pre-applied.

    Also, realizing I made a small ordering mistake in the number of specific components I needed to place on the PCB, I am currently waiting for that order to complete the assembly.

    1. Unfortunately, the PCB is designed with heat dissipation in mind. It is made almost entirely of aluminum, making it more challenging to get the solder to the required melting temperature. ↩︎

  • React State | Front-end Web Development

    A new concept I’m starting to learn in my Coursera course on React Basics (view post series here) is React “States.” States in React is an interesting way of storing the “state” or current information about a variable or function.

    As a new topic, I’m still learning how React works. For an actual professional, please refer to a better explanation.

    The first example of utilizing state is the “React.useState” hook. To use useState, you assign it to two array values that usually consist of one variable storing the value and another variable to set the value of the state. For example:

    import { useState } from 'react';
    
    function exampleApp() {
        const [user, setUser] = useState("ezra");
        
    }

    First, we import the state hook. Then, in the function, we assign two variables to the useState hook. Inside of the state, it has “Ezra,” which, in this case, sets the default value. If we wanted to add a function to update the state to a value, we could do so as follows:

        
        function updateUser(e) {
            setUser(e.target.value);
        }
    

    Coursera outlines that you generally want to utilize separate functions to handle events. In this case, we have a function that, when called in combination with an input field, will grab the input’s value (e.target.value). We use the setUser that we already declared earlier.

    The complete component example they taught me was:

    import { useState } from 'react';
    
    function ExampleApp() {
        const [user, setUser] = useState("ezra");
    
        function updateUser(e) {
            setUser(e.target.value);
        }
        return (
            <div>
                <h1>{user}</h1>
                <input onInput={updateUser}></input>
            </div>
        )
    }
    export default ExampleApp;

    This creates a page with an H1 element and an Input field. By default, H1 says “Ezra,” but when you type into the input field, it actively changes to what you type.

    example code demonstrated for useState

    It is an excellent and useful concept that will probably be used frequently in future React programming. Coursera also outlined a general guideline for creating components, specifically when and when not to use states.

    As the name implies, you have Stateless and Stateful components, one without any state declarations and others with state declarations. It goes to the basics of how you want things formatted and makes it much easier to later grab the state of an object by passing it down from a parent to a child component rather than having to reinstate that state in each element.

    example of stateful and stateless components in react
    credit: Coursera.org

    States in react go a lot deeper and a lot more complex, but I’m excited to learn more about it.